
Ombre nails have been popular for several years, and for good reason—they offer a smooth gradient of colors that can be as subtle or bold as you like. Traditionally, ombre nails transition from one color to another, often going from light to dark. However, the trend has evolved, giving rise to aura nails, which create a glowing effect, almost as if the colors are radiating energy.
Aura nails incorporate soft transitions that mimic energy fields and often use shimmery or holographic powders to enhance the effect. In this design, the combination of purple ombre and a shimmery aura finish gives off a magical, ethereal vibe. By adding pearl embellishments, the design gets an extra touch of elegance, making it perfect for anyone who wants their nails to exude sophistication.
Why Pearls on Purple Ombre Aura Nails?
Purple has long been associated with royalty, mystery, and creativity, and when paired with the trending aura style, it adds an almost otherworldly appeal. The pearls elevate this design, making it feel luxurious without being too over-the-top. In the world of nail art, where intricate designs are highly sought after, this look strikes a balance between trendy and timeless. The aura effect creates dimension, and the pearls add texture, making the nails look like wearable art.
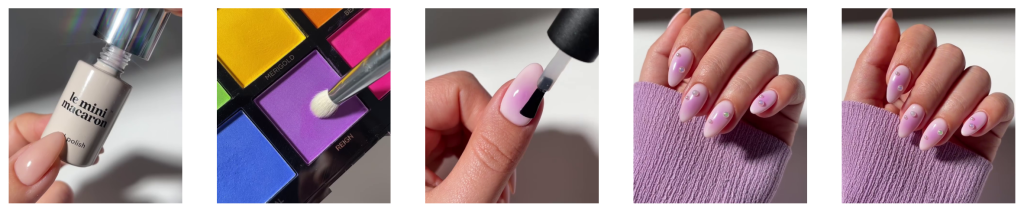
Step-by-Step Guide to Creating Pearls on Purple Aura Ombre Nails
1. Base Preparation and Nail Care
As with any manicure, the first step is ensuring that your nails are clean and properly prepped. Follow these steps for a flawless base:
- Start by shaping your nails. File them into the desired shape—whether that’s almond, square, or coffin—and make sure the surface of the nails is smooth.
- Push back the cuticles and remove any dead skin. This gives a clean and professional look.
- Apply a base coat. A clear base coat not only protects your natural nails but also helps the polish adhere better, ensuring your design lasts longer.
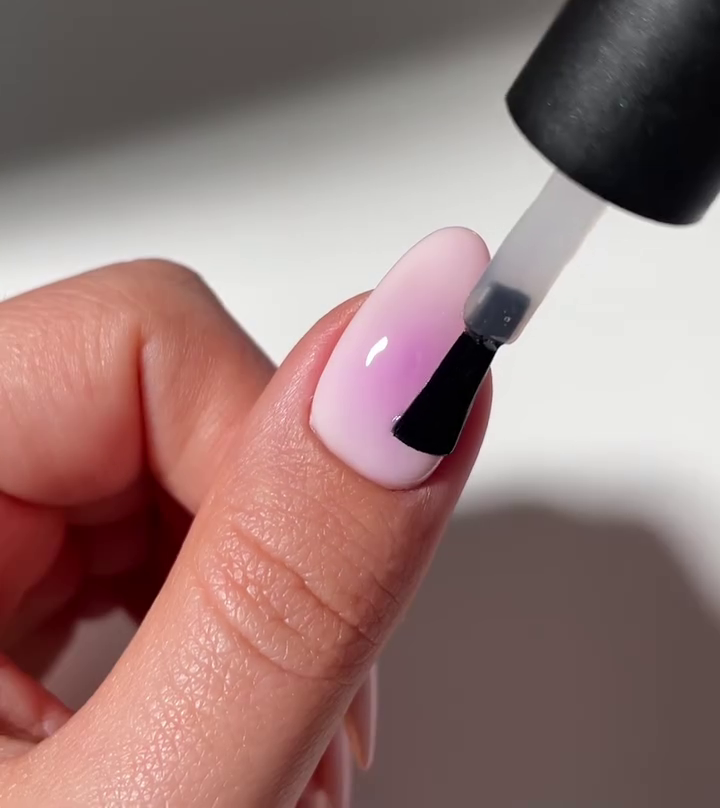
2. Applying the Purple Ombre Effect
The purple ombre is the star of this look. To create a seamless gradient, follow these steps:
- Choose two shades of purple. For the base, opt for a lighter lavender or lilac shade, and for the tips, select a darker purple or even violet.
- Apply the lighter purple shade to the entire nail and let it dry for a few seconds. This serves as your base color.
- For the ombre effect, use a small sponge or blending brush. Dip the sponge in the darker purple shade and gently dab it onto the tips of your nails, blending upward toward the middle. You want to create a soft gradient between the two colors.
- Blend carefully until the transition looks smooth and seamless. If needed, apply a second coat for a more vibrant ombre.
- Once satisfied with the ombre, cure the nails under a UV or LED lamp if using gel polish.
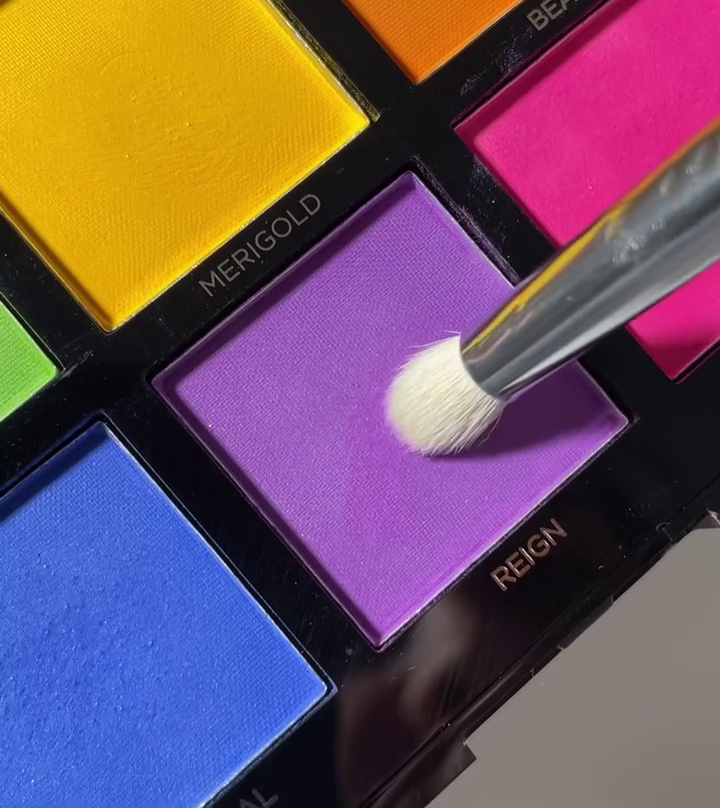
3. Adding the Aura Effect
The magic of this design lies in the ethereal aura effect. Here’s how to achieve that glowing, almost holographic finish:
- Choose a shimmery or holographic powder. You can find these powders in various colors, but for this look, go with something that enhances the purple, such as a silver, iridescent, or lavender shimmer.
- Using an eyeshadow applicator or a soft sponge, gently rub the powder onto the nails. Focus on the areas where the ombre transition happens, as this is where the “aura” will be most prominent.
- The powder should add a slight glow, giving the appearance of energy radiating from the nails.
- Once applied, seal the powder with a clear top coat and cure the nails again to lock in the aura effect.

4. Placing the Pearl Embellishments
Now that the ombre and aura effects are complete, it’s time to add the finishing touch: the pearls. Pearls add an elegant texture and dimension to the nails, elevating the look from everyday to extraordinary.
- Apply a small dot of nail glue or builder gel where you want to place the pearls. Popular placements include along the cuticle line or in a cascading diagonal across one or two accent nails.
- Use tweezers or a nail art tool to carefully place the pearls onto the glue. Make sure they are secure but don’t press too hard.
- Depending on your desired look, you can opt for different sizes of pearls, placing larger pearls on one nail and smaller ones on the others for variation.
- Once the pearls are placed, add another layer of top coat over the nails, making sure to avoid the pearls directly. This step ensures the pearls are locked in place without losing their shine.

5. Finishing Touches
With the pearls securely in place and your ombre aura glowing beautifully, the final step is sealing the entire look:
- Apply a final top coat to all the nails, being careful around the pearls. This not only adds extra shine but also protects the design from chipping.
- Cure the nails under the UV or LED lamp one last time, and voila! You now have stunning Pearls on Purple Aura Ombre Nails.
Maintaining Your Look
While this design looks amazing, it’s important to take steps to maintain your nails for as long as possible. Here are some tips:
- Moisturize your cuticles daily with cuticle oil to keep them healthy.
- Avoid using your nails as tools to prevent chipping or pearl loss.
- If a pearl becomes loose, you can reattach it with a dab of nail glue.
Conclusion
Pearls on Purple Aura Ombre Nails are not just a trend—they’re a statement. Combining the elegance of pearls, the soothing vibes of purple, and the mystical allure of aura effects, this design is perfect for those who want their nails to stand out. Whether you’re flaunting them at a special event or just in your everyday life, these nails are sure to turn heads. Best of all, with the right tools and patience, you can recreate this look at home!